Configuring Internet-Facing Deployment for Dynamics CRM
Configuring Internet-Facing Deployment for Dynamics CRM with AD FS is easy when you know how
Microsoft Dynamics CRM Online is super-easy to setup; you simply direct Office 365 to provision your CRM organization, and you’re up-and-running in a few minutes…, ah, the beauty of cloud-based applications. Some businesses, however, have not yet made the leap of faith to let their mission-critical applications software run in the cloud, and prefer to keep them in-house. If you have an on-premises deployment of Microsoft Dynamics CRM, and are looking enable your remote / mobile users, you’ll most likely decide that the CRM Internet-Facing Deployment (IFD) is the way to go.
With CRM configured for Internet-Facing Deployment, your remote / off-site / mobile users will be able to connect to the CRM system with a web client without a VPN, with the CRM Mobile App, or if you want to install third-party add-ons like ClickDimensions — then you’ll need to configure the Internet-Facing Deployment.
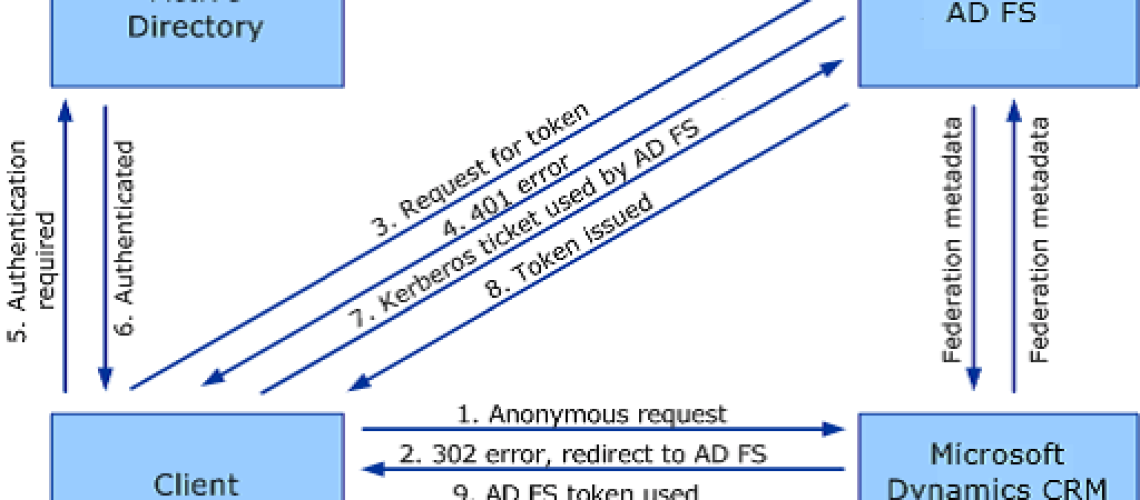
Microsoft Dynamics CRM IFD utilizes claims-based authentication, an identity access solution designed to provide simplified user access and single sign-on access to Microsoft Dynamics CRM data. Claims-based authentication is built on Windows Identity Foundation (WIF), a framework for building claims-aware applications and security token service (STS) that is standards-based and interoperable. Interoperability is provided through reliance on industry standard protocols such as WS-Federation, WS-Trust, and Security Assertion Markup Language 1.1 (SAML).This document uses Active Directory Federation Services 2.0 (AD FS 2.0) as the identity provider.
In claims-based authentication, an identity provider, or security token service, responds to authentication requests and issues SAML security tokens that include any number of claims about a user, such as a user name and groups the user belongs to. A relying party application receives the SAML token and uses the claims inside to decide whether to grant the client access to the requested resource. Claims-based authentication can be used to authenticate your organization’s internal users, external users, and users from partner organizations.
In this article we’ll show you the details of configuring Internet-Facing Deployment for Dynamics CRM. In this example, we’ll be using CRM 2013 on a Windows Server 2012 R2 machine.
- We installed two Windows Server 2012 r2 machines in Hyper-V (the CRM Server and the SQL Server), and added them both to the local domain as member servers.
- We installed SQL Server 2012 on the SQL Server machine and CRM 2013 on the CRM Server using port 5555
In order to configure CRM with IFD, it is required to first install AD FS, get a wild card certificate, add DNS records, and create firewall rules to allow the traffic over the internet. - Since this is a test environment, I created and utilized a self-assigned wildcard certificate
- Another alternative would be to purchase a commercial Wildcard SSL Certificate, a low-priced provider that we like is Comodo.
Now that your domain certificate is created if you need to move it to the CRM server. In order to do this you would export it to a file from IIS with the key and then import it to the CRM server.
Export wildcard certificate to a file and import wildcard certificate to the CRM server
In order to export the certificate to a file create a folder where you can get to it from the CRM server.
In IIS right click on the wildcard certificate and select export
- In the export certificate box select the location of the folder and name the certificate file.
- You must add a password for security and click OK
On the CRM server open IIS and import the certificate.
Select the file location where you exported the certificate and the password you created when exporting it when prompted.
Bind the Wildcard certificate to the CRM website
In IIS expand the server and websites. Click on the Microsoft Dynamics CRM website and from the actions pane click on bindings.
- Your site binding will be HTTP on port 5555
- Click the add button
- In the next window in the drop down select https
- Then change the port to 5554 and select the wildcard certificate and click OK
- Now you will need to delete the Http binding in order to change the https binding to 5555 it should look like this when you are done
Install ADFS 3.0 role on Windows Server 2012 R2
Go to server manager and click on add roles and features
On the select installation type screen choose role-based or feature-based installation and click next
Then select the server where the role will be installed and click next
Select Active Directory Federation Services and click next three times and click install
After the installation is done you will need to click on the “configure the federation service on this server” link to start the configuration.
On the first screen of the wizard you will select “create the first federation server in a federation server farm” and click next
***NOTE***
To install any server role or feature, including the AD FS server role or the Web Application Proxy role service (part of the Remote Access server role), you must be a member of the local Administrators group on the target server.
To configure AD FS, whether you create a new federation server farm or add nodes to an existing federation server farm, you must be a member of the Domain Admins group in the domain to which the federation server is joined.
Select the account with the correct permissions from this screen
On the next page choose the wildcard certificate from the drop down and then change the federation service name to the one you have selected( this name must have an external and internal DNS entry). In the Federation Service Display Name you will add what you want users to see when they logon externally. Click next.
***NOTE***
On the Specify Service Account page, specify a service account. You can either create or use an existing group Managed Service Account (gMSA) or use an existing domain user account. If you select the option to create a new gMSA, specify a name for the new account. If you select the option to use an existing gMSA or domain account, click the Select… button to select an account.
The benefit of using a gMSA is its auto-negotiated password update feature.
***WARNING***
If you want to use a gMSA, you must have at least one domain controller in your environment that is running Windows Server 2012 operating system.
If the gMSA option is disabled and you see an error message similar to Group Managed Service Accounts are not available because the KDS Root Key has not been set, you can enable gMSA in your domain by executing the following Windows PowerShell command on a Windows Server 2012 or later domain controller in your Active Directory domain: Add-KdsRootKey –EffectiveTime (Get-Date).AddHours(-10).Then return to the wizard and click the Previous button followed by the Next button to re-enter the Specify Service Account page. The gMSA should now be enabled, and you can select it and enter a desired gMSA account name.
THIS IS THE SCREEN YOU RECEIVE IF YOU DO NOT RUN THE POWERSHELL COMMAND
Open windows PowerShell as an administrator and type “Add-KdsRootKey –EffectiveTime (Get-Date).AddHours(-10)” without the quotes and hit enter. Return to the wizard and click the previous button and then next again.
You can create an account or use an account you have already created by selecting it I will create and account named “ManagedServiceAccount” for this example Click next
On the next screen we need to create the ADFS database and you can use an existing SQL server instance or create the database using the windows internal database the selection I have made.
You get a review screen click next for the prerequisite checks to be done
The warning you will see is informative to let you know if you have multiple domain controllers on your network it will take time for the key for the Managed Service Account to replicate across the forest
Click configure
DNS records that need to be added
With an internet facing deployment you need both internal and external DNS records.
As for DNS records we would need the following:
- External DNS A Records
- Organization will need a DNS record (mscrm.pmtv.com) resolves to CRM Server
- ADFS DNS record (sts.mydomain.com) resolves to ADFS Server
- CRM Auth record (auth.mydomain.com) resolves to CRM Server
- CRM Discovery Service record (disc.mydomain.com) resolves to CRM Server
- Internal DNS A Records
- CRM Internal URL record (internalcrm.mydomain.com) resolves to CRM Server
- All of the other DNS records above sts,auth,disc need to resolve externally so we will create a new forward lookup zone to do this because our wildcard certificate is *.mydomain.com
***NOTE*** if you are using a public certificate the steps are different***
Create new forward lookup Zone and DNS records
Open DNS management console expand server node and expand forward lookup zones. Right click and click new zone.
Select Primary zone and click next
On the Active Directory Zone Replication Scope click next or the selection that suites your network
On the Zone name page type your domain.com domain and click next two times and then finish
The new forward lookup zone should look like this
Now expand the new forward lookup zone and add all of the A records you need. The records should point to the appropriate internal servers IP address or if ADFS and CRM are on the same server like in this instance all to the same IP Address. All external DNS record should be A records pointing to a public static IP Address.
Setting SPN Records for the Internet-Facing Deployment
Now that ADFS is installed and configured the wildcard certificate is applied to the CRM website and all of our DNS records are created we can start the claims and IFD configurations. Wait a minute with ADFS 3.0 there is another step and I guess we should make sure we have the correct SPN records for our server. First let’s open the ADFS configuration console and click on Authentication Policies. In the right pane under Primary Authentication next to global settings click the ‘edit’ link
Under the Intranet box put a checkbox next to “forms Authentication” and click apply then ok
In ADFS 2.0 and 2.1 you would need to create two SPN records in order for CRM to work properly.
For the IFD setup if you are using Windows 2008 or Windows 2012 (ADFS 2.0 – 2.1) you will need to add two SPN’s if they haven’t been added already:
Find out which account is running the ADFS Application Pool. If it is network service then use the machine name in the command below for SERVICEACCOUNT. If it is a user account then use Domainusername in the command below for SERVICEACCOUNT.
- Setspn -a http/stsurl.domain.com SERVICEACCOUNT
- Setspn -a http/crminternalurl.domain.com SERVICEACCOUNT
If you are using Windows Server 2012 R2 (ADFS 3.0) you only need to add the CRM SPN as ADFS will create its own SPN automatically.
- Setspn -a http/crminternalurl.domain.com SERVICEACCOUNT
You do not need any ports or anything on this just the URL.
Open an admin command prompt on the CRM server and type “setspn –l domainserviceAccount”
You should get (2) results:
- http/servername.localdomain.local
- http/servername
You have to add httpinternalcrm.mydomain.com
You do this by typing “Setspn -a http/crminternalurl.domain.com SERVICEACCOUNT” without the quotes
Then when you run the “setspn –l domainserviceAccount” command you should see
- http/servername.localdomain.local
- http/servername
- http/internalcrm.mydomain.com
Now we can configure Claims and IFD through the CRM deployment manager.


No comment yet, add your voice below!