Configuring Self-Assigned SSL Certificate for Dynamics CRM IFD
Configuring Self-Assigned SSL Certificate for Dynamics CRM IFD is easy when you know how
Microsoft Dynamics CRM Internet-Facing Deployment (IFD) utilizes claims-based authentication, an identity access solution designed to provide simplified user access and single sign-on access to Microsoft Dynamics CRM data. Claims-based authentication is built on Windows Identity Foundation (WIF), a framework for building claims-aware applications and security token service (STS) that is standards-based and interoperable. Interoperability is provided through reliance on industry standard protocols such as WS-Federation, WS-Trust, and Security Assertion Markup Language 1.1 (SAML). This document uses Active Directory Federation Services 2.0 (AD FS 2.0) as the identity provider.
In claims-based authentication, an identity provider, or security token service, responds to authentication requests and issues SAML security tokens that include any number of claims about a user, such as a username and groups the user belongs to. A relying party application receives the SAML token and uses the claims inside to decide whether to grant the client access to the requested resource. Claims-based authentication can be used to authenticate your organization’s internal users, external users, and users from partner organizations.
In this article we’ll show you the details of installing a self-assigned SSL Certificate. In this example, we’ll be using CRM 2013 on a Windows Server 2012 R2 machine.
- We installed two Windows Server 2012 r2 machines in Hyper-V (the CRM Server and the SQL Server), and added them both to the local domain as member servers.
- We installed SQL Server 2012 on the SQL Server machine and CRM 2013 on the CRM Server using port 5555
In order to configure CRM with IFD, it is required to first install AD FS, get a wild card certificate, add DNS records, and create firewall rules to allow the traffic over the internet. - Since this is a test environment I utilized a self-assigned wildcard certificate.
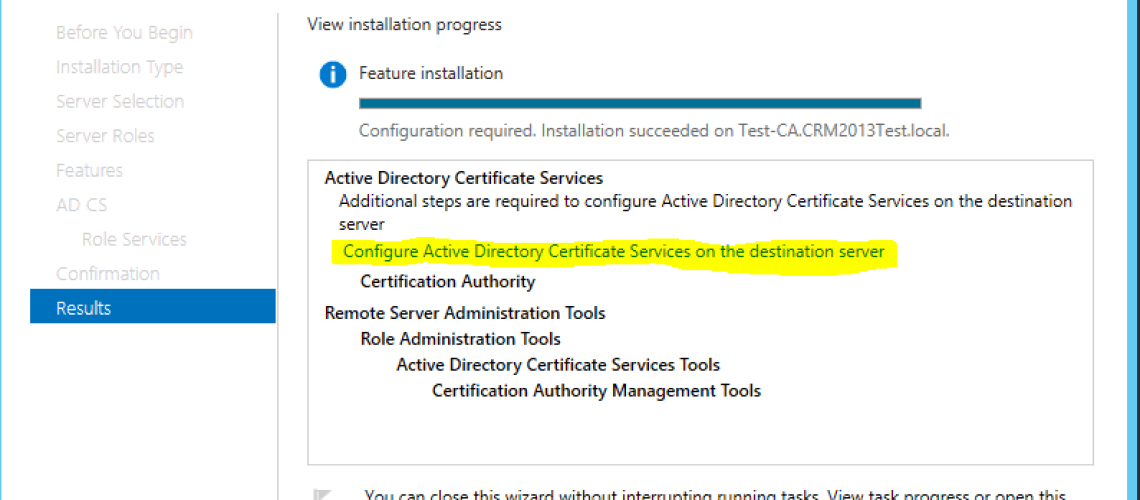
- First, we installed and configured a certificate authority using this technet article: https://technet.microsoft.com/en-us/library/cc731183.aspx
(TIP: If you are going to issue a domain root wildcard certificate during the configuration, use enterprise not standalone certificate authority)
***Important*** the account you use to configure the certificate authority must be an enterprise and local administrator on the server you are installing the role.
Next then select certification authority
Next choose enterprise CA not stand alone. (If you choose the standalone CA when you go to create the domain certificate you will receive an error “Parameter is incorrect 0x80070057”)
Select a root CA as the CA type
Create a new private key
Leave the defaults on the Cryptography for CA
Leave the defaults for the CA Name
Leave the validity period at 5 years (You can change this to whatever you want but for this demo I am leaving it as the default)
Again you can move this but I am leaving the defaults for the certificate database
Then you get the confirmation page for the setting you made then click configure
After the certificate authority role is added and configured I created a domain wild card certificate.
Create the domain wildcard Certificate
Open IIS and click on the server name then double click server certificates in the features view as shown below
Click Create a domain certificate in the actions pane
Fill out the required information
- Common Name — Fully-qualified domain name (FQDN) — or URL — for which you plan to use your certificate (the area of your site you want customers to connect to using SSL).
If you are requesting a wildcard certificate, add an asterisk (*) on the left side of the Common Name (e.g., *.domain.com).
- Organization — The name in which your business is legally registered. The organization must be the legal registrant of the domain name in the certificate request.
- Organizational Unit — Use this field to differentiate between divisions within an organization (such as “Engineering” or “Human Resources”).
- City/Locality — Name of the city in which your organization is registered/located. Do not abbreviate.
- State/Province — Name of state or province where your organization is located. Do not abbreviate.
- Country — The two-letter International Organization for Standardization- (ISO-) format country code for the country in which your organization is legally registered.
Click next
Click on the select link and your certificate authority should be there to choose then give your certificate a friendly name so you recognize it later and click finish.
Now that your domain certificate is created if you need to move it to the CRM server. In order to do this you would export it to a file from IIS with the key and then import it to the CRM server.
Export wildcard certificate to a file and import wildcard certificate to the CRM server
In order to export the certificate to a file create a folder where you can get to it from the CRM server.
In IIS right click on the wildcard certificate and select export
- In the export certificate box select the location of the folder and name the certificate file.
- You must add a password for security and click OK
On the CRM server open IIS and import the certificate.
Select the file location where you exported the certificate and the password you created when exporting it when prompted.
Bind the Wildcard certificate to the CRM website
In IIS expand the server and websites. Click on the Microsoft Dynamics CRM website and from the actions pane click on bindings.
- Your site binding will be HTTP on port 5555
- Click the add button
- In the next window in the drop down select https
- Then change the port to 5554 and select the wildcard certificate and click OK
- Now you will need to delete the Http binding in order to change the https binding to 5555 it should look like this when you are done


No comment yet, add your voice below!