Oftentimes SPAM E-mail makes it through your defenses and into your Inbox. A possible cause for this could be that your Microsoft Anti-SPAM agents have a higher priority than your Symantec Mail Security (SMSMSE) Transport Agents.
First, check your configuration: you’re running Microsoft Exchange, check. You have Microsoft Anti-SPAM agents installed, yes. You have Symentec Endpoint Protection for your Exchange Server, and you’re still getting SPAM in your Inbox. Are your Microsoft Anti-SPAM agents set to a higher priority than your SMSMSE Transport Agents? Whoa! Hold it right there. Better check your priorities, son!
Let’s open up the Exchange Management Shell, and take a look under the hood. At the prompt, type the command:
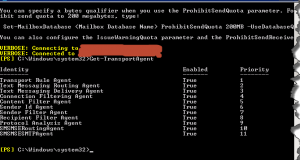
Get-TransportAgent
Result should be like this:

Additional possible Identity Enabled Priority outputs could be:
Identity Enabled Priority
——– ——- ——–
Transport Rule Agent True 1
Journaling Agent True 2
AD RMS Prelicensing Agent False 3
SMSMSERoutingAgent True 4
SMSMSESMTPAgent True 5
Connection Filtering Agent True 6
Content Filter Agent True 7
Sender Id Agent True 8
Sender Filter Agent True 9
Recipient Filter Agent True 10
Protocol Analysis Agent True 11
OR
Identity Enabled Priority
——– ——- ——–
Transport Rule Agent True 1
Journaling Agent True 2
AD RMS Prelicensing Agent False 3
Connection Filtering Agent False 4
Content Filter Agent False 5
Sender Id Agent False 6
Sender Filter Agent False 7
Recipient Filter Agent False 8
Protocol Analysis Agent False 9
SMSMSERoutingAgent True 10
SMSMSESMTPAgent True 11
OR
Identity Enabled Priority
——– ——- ——–
Transport Rule Agent True 1
Journaling Agent True 2
AD RMS Prelicensing Agent False 3
Connection Filtering Agent True 4
Content Filter Agent True 5
Sender Id Agent True 6
Sender Filter Agent True 7
Recipient Filter Agent True 8
Protocol Analysis Agent True 9
SMSMSERoutingAgent True 10
SMSMSESMTPAgent True 11
If the Microsoft’s Anti-SPAM agents have a higher priority than the SMSMSE Anti-Spam agents (as shown in the above screen shot), then the message may not be passed to the Premium Anti-SPAM scanner for verification at all. Or even if the Premium Anti-Spam is partially working, but not detecting all SPAM E-mails…it’s time to amp-up the Anti-SPAM!
To configure the SMSMSE agents to be of a higher priority than the Microsoft Exchange agents:
Open the Exchange Management Shell. Run the following commands:
Set-TransportAgent -identity “SMSMSERoutingAgent” -priority 4
Set-transportagent -identity “SMSMSESMTPAgent” -priority 5
Note: Priority 4 and 5 were selected in this example to ensure the “SMSMSERoutingAgent” and “SMSMSESMTPAgent” were placed before the Microsoft “Connection Filtering Agent”. Review the output of the “Get-TransportAgent” command on your system to select an appropriate priority of the SMSMSE agents.
Then run the following command from the Exchange Management shell to restart the transport agent service:
restart-service -force MSExchangeTransport
To disable the Exchange agents;:
Open the Exchange Management Shell. run the following commands:
disable-transportagent -identity “Connection Filtering Agent”
disable-transportagent -identity “Sender Id Agent”
disable-transportagent -identity “Sender Filter Agent”
disable-transportagent -identity “Recipient Filter Agent”
disable-transportagent -identity “Protocol Analysis Agent”
disable-transportagent -identity “Content Filter Agent”
Then run the following command from the Exchange Management shell to restart the transport agent service:
restart-service -force MSExchangeTransport
You might encounter an error when executing the commands, about not being able to edit the config file. This can be resolved by opening the Exchange Management Console as administrator and executing the commands again.
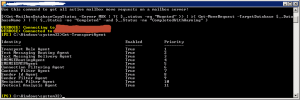
After going through these steps re-run the “Get-TrasportAgent” command in Microsoft Exchange PowerShell and you will find that the SMSMSE Routing Agent and the SMSMSE SMTP Agents are now before the Connection Filtering Agent as shown in this screen shot.


No comment yet, add your voice below!